|
After you've installed a Firebird
server, you need to create a database on this server using the
"Database
manager". function, or simply
copy any existing database onto a server PC. Since version 5.0
local and shared databases have absolutely identical structure, so
you can use any database file for multi-user access. In this case
you should add a server database into the "Database
manager" window:
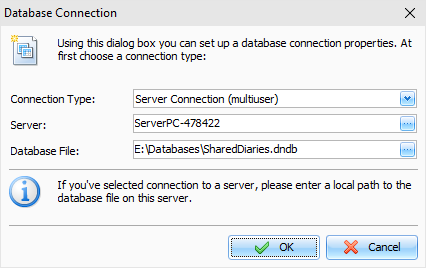
Here you need enter a server name
or server IP address and a full path to the database file on
server. Please note that this is a local path to the database. You should not enter a server
name or a network drive here. For example, if your database in the
"E:\Databases\diary.dndb"
folder on your server, you should enter this path when create or
add a database connection.
Now you are ready to connect to a
server. Just select your new connection in the "Database
manager" and click the
"Open" button (if you create database, it will be
opened automatically). You will see "Connect to a
server" window:
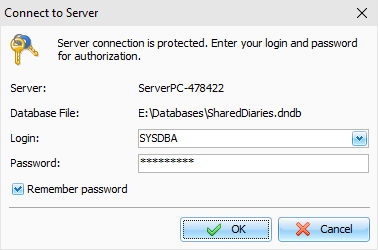
Here you see a server name and
database path. Enter user login and password. When connecting for
the first time you should log in using the default administrator
account:
login - SYSDBA, password - masterkey.
You can change default password
for SYSDBA account in the "Users manager" window.
Click OK and you will be connected to the
database.
Now you can add users in the
"Users
manager" window. This
function is available only for SYSDBA account.
After this you are ready to work.
Just add a server database into the "Database
manager" window on all client
computers and connect to this database.
If you have problems with the
connection
Make sure that the
Firebird
server is installed and running on
the computer that is playing the server role.
If
the program on the user's computer cannot connect to the database
on the server, then you need to check whether incoming and outgoing
connections from the user's computer and the server are allowed on
port 3050. This port must be opened in the Windows
firewall.
Also, in rare cases, additional
configuration of the server may be required. If the connection is
successfully established on the user's computer, but changes in the
network database are not visible in real time, then do the
following:
On
the server, in the file "...\Program Files
(x86)\Firebird\Firebird_3_0\firebird.conf", remove the comment (character
#) from the line:
#RemoteAuxPort=0
and
specify a fixed port number, for example:
RemoteAuxPort=3051
This
is a fixed port for the event notifier. You also need to open
port 3051 in the firewall and then restart your computer or
restart Firebird service.
|

